Microsoft Teams Connector
Description
The Microsoft Teams Connector allows you to integrate myCloudPBX with Microsoft Teams using Direct Routing. This enables Teams users to place and receive external phone calls via the same infrastructure used by traditional myCloudPBX users.
Use Cases
- Let Teams users be part of internal ring groups, call queues, or any other existing call flows.
- Seamlessly integrate Microsoft Teams into your existing PBX workflow
- Support hybrid deployments or smooth migration from desk phones to Teams-only environments
Prerequisites
Before you begin, ensure you have the following:
- An active Microsoft 365 subscription, the following SKU's are acceptable:
- Office 365 E1/E3/E5/A3/A5 or Microsoft 365 E3/E5/A3/A5 Standard/Premium
- Microsoft Teams license:
- Microsoft Teams Phone Standard
- Administrator access to the Microsoft Teams instance you want to connect.
Connector Setup Process
PBX Portal Configuration
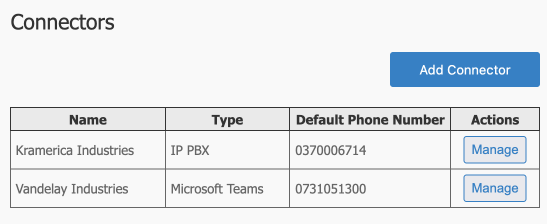
To Configure a new connector for Microsoft Teams, click on the 'PBX Connectors', icon from the PBX Configuration screen.
Here you can see your existing connectors.
- To manage an existing connector, click 'Manage'.
- To create a new connector click 'Add Connector'.
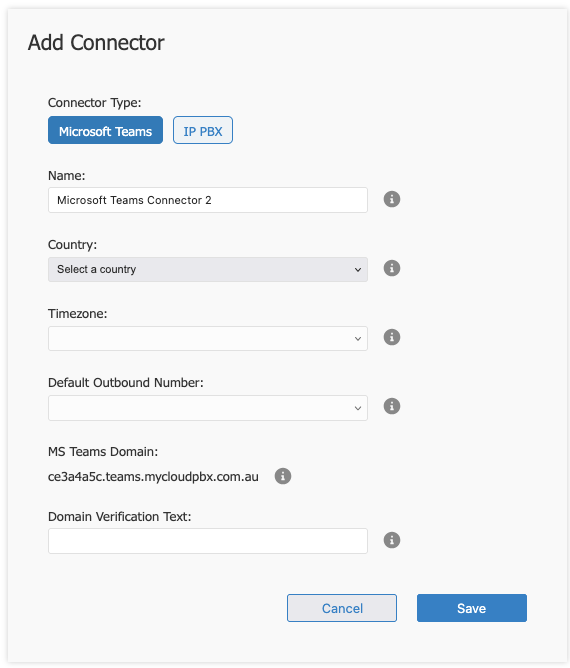
Configure as follows:
Connector Type: Microsoft Teams.
Name: This is for your reference.
Country: Sets the default regional settings (e.g. number formatting).
Timezone: Used for logs and time-sensitive operations.
Default Outbound Number: This will be used for the Outbound Caller ID for external calls.
MS Teams Domain: A unique domain allocated for use with Microsoft Teams Direct Routing e.g.
example.teams.mycloudpbx.com.au.
Tip
Remember this unique domain name as you will need it later when configuring the Microsoft end.
- Domain Verification Text: You won't have this yet, so leave it blank and click 'Save'.
Next, we create the users within the myCloudPBX Configuration Portal on the Connector Management Screen. This should match the extension numbers you will create within Microsoft Teams.
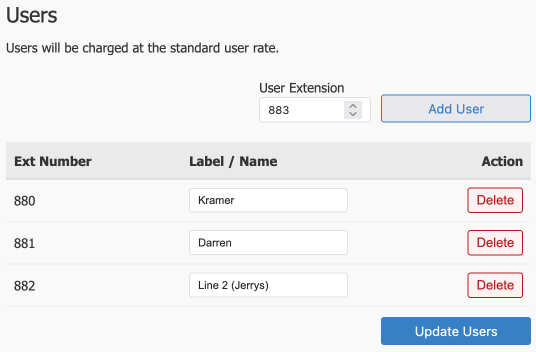
The right-hand panel allows you to define which internal users (extensions) are part of the Teams integration:
Adding a User:
- Enter the extension number in the User Extension field (e.g.
116) - Click Add User
- Optionally assign a name to help identify the user
- Click Update Users to save changes
Teams Configuration
Domain Verification
To complete the Microsoft Teams Direct Routing setup, you must now verify the Teams domain in Microsoft 365.
Prepare Your Environment
Add Domain:
- Navigate to the Microsoft Admin Center.
- Log in with your administrator credentials.
- Go to Settings > Domains.
- Add your provided domain
example.teams.mycloudpbx.com.au. - Select Add a TXT record to the domain's DNS records and Continue.
- Note the newly generated eg:
TXT value (MS=msxxxxx).
Verify Domain:
- In a new tab, Navigate back to the myCloudPBX Configuration Portal and Enter the TXT record generated by Microsoft in the previous step and click Save.
- Allow 5-10 minutes for the DNS changes to be completed by myCloudPBX.
- Navigate back to the Microsoft Admin Center.
- Continue the setup by selecting Verify.
- Uncheck Exchange and Exchange Online Protection and click Continue.
- Click Done to complete.
Activate your unique myCloudPBX Teams Domain
To activate, we will need to create a single 'Activation User', this user will be tempory and can be removed once setup is complete.
Step 1. From the Admin Center, select Users > Active User > Add a User
Step 2. Enter the following details
| Setting | Value |
|---|---|
| First Name | Teams |
| Last Name | Activation |
| Display Name | Teams Activation |
| Username | Teams Activation |
| Domain | Add the domain name provided in prior steps. eg example.teams.mycloudpbx.com.au |
Step 3. Check Automaically create a password.
Step 4. Uncheck Require this user to change their password.
Step 5. Uncheck Send password in email.
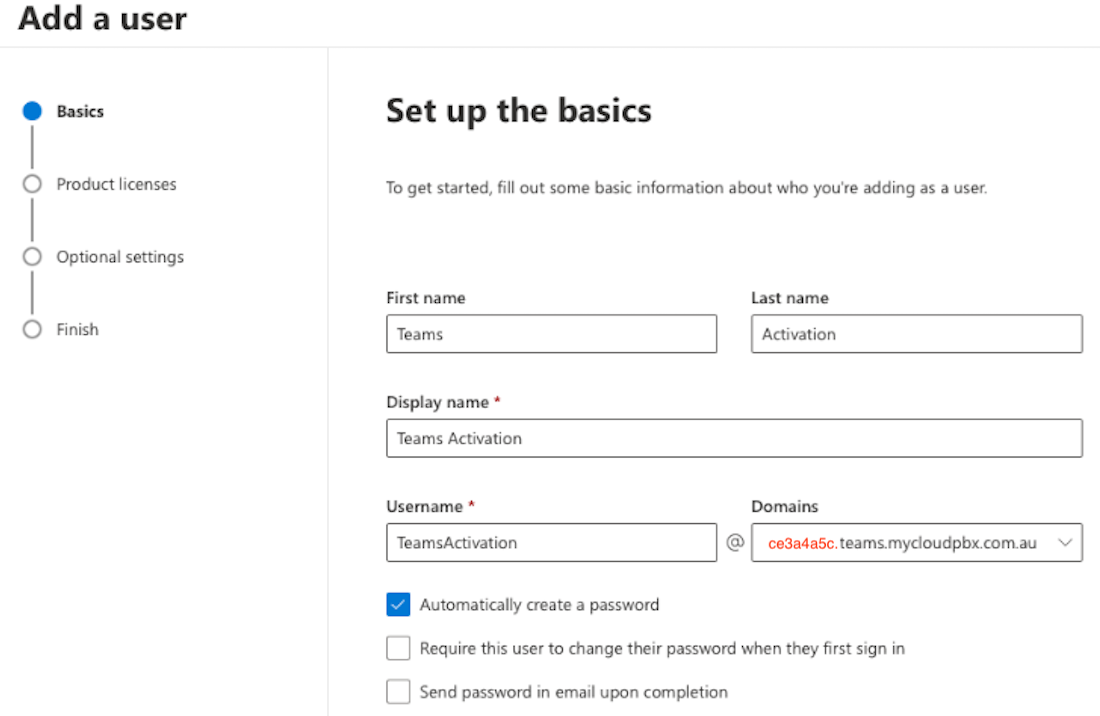
Step 6. Assign the User a Microsoft 365 subscription with Microsoft Teams Phone
Configure Direct Routing
Log in to Microsoft Teams Admin Center:
- Navigate to the Microsoft Teams Admin Center.
- Log in with your administrator credentials.
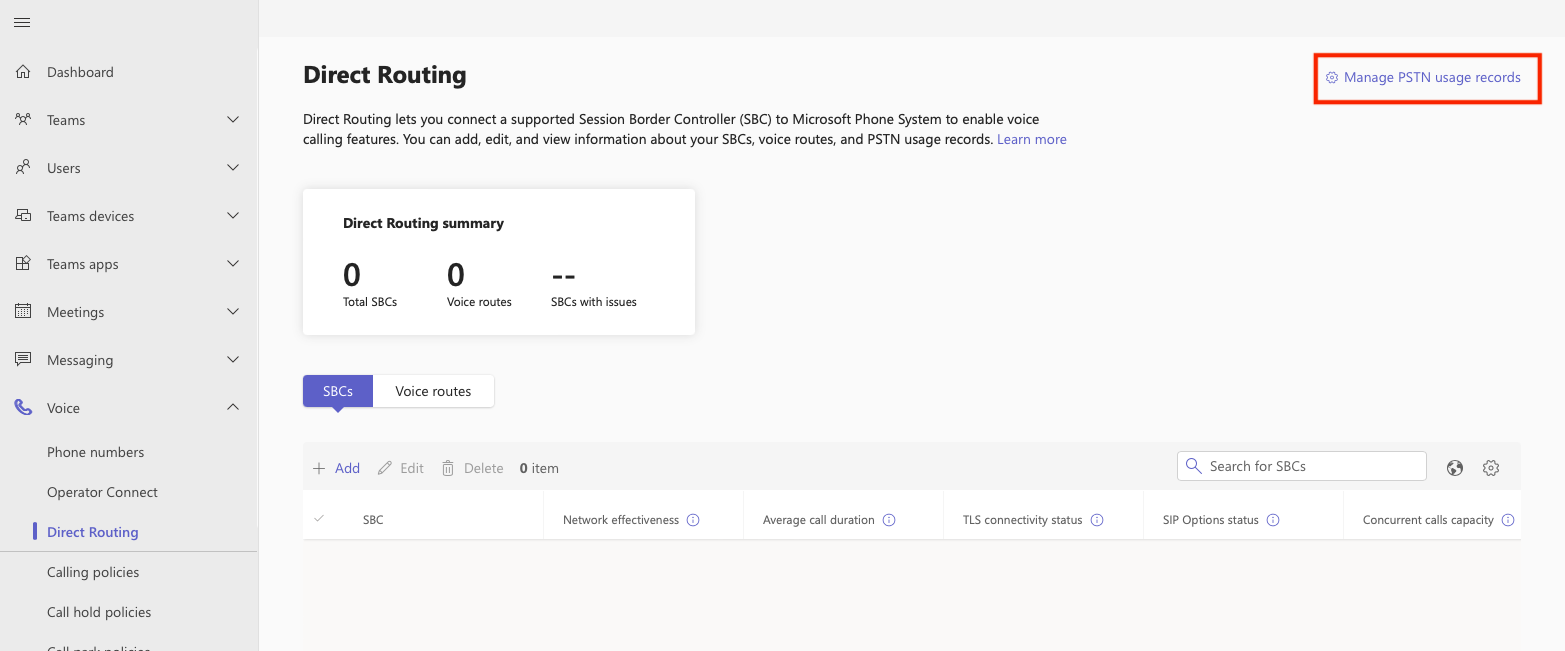
Set Up PSTN Gateway:
- In the Teams Admin Center, go to Voice > Direct Routing.
- Click on Manage PSTN usage records
Click Add and enter your unique Teams URL (eg
example.teams.mycloudpbx.com.au) and ApplyConnect to PowerShell and enter the following:
Import-Module MicrosoftTeams

Connect-MicrosoftTeams
When prompted enter your Microsoft Teams Admin user details.
New-CsOnlineVoiceRoute -Identity example.teams.mycloudpbx.com.au -NumberPattern ".*." -Priority 1 -OnlinePstnUsages example.teams.mycloudpbx.com.au -OnlinePstnGatewayList example.teams.mycloudpbx.com.au
Tip
Replace example.teams.mycloudpbx.com.au with your unique domain.
Voice Routing Policies
- In the Microsoft Teams Admin Center, navigate to Voice > Voice routing policies.
- Click on Add to create a new voice routing policy.
- Enter your unique Teams URL (eg
example.teams.mycloudpbx.com.au) - Under PSTN Usage Records, select the PSTN usage record that applies to your Direct Routing configuration.
- Add the newly created PSTN usage record to the policy.
Assign Voice Routing Policies:
- Go to Users > Manage users.
- Select the users you want to assign the voice routing policy to.
- Click on Edit and assign
example.teams.mycloudpbx.com.auto the selected users.
Note
Teams activation can take up to 24 hours.
You can check the activation status by selecting Analytics & reports > Usage reports > PSTN and SMS (preview) usage
Teams User Mapping
Note
For myCloudPBX and Microsoft Teams to work together, the Teams user extension numbers must be mapped here .
This tells myCloudPBX to route calls to these users via the Microsoft Teams instance directly.
First, allocate each Teams User with an Extension Number (These should match the users created earlier on the myCloudPBX Connector Configuration screen.
- Log in to the Microsoft Teams Admin Center.
- Navigate to Users → Manage Users.
- For each user who should use Direct Routing:
- Assign a phone number matching the extension configured in myCloudPBX (e.g.
101) - Ensure voice routing policies are applied.
Configure Dial Plans
Microsoft Teams uses E.164. We will create a series of normalisation rules to align with the standard telephone number format for end users.
- Go to Voice > Dials Plans
- Click Add
- Name the Dial Plan
[STATE] myCLoudPBX. We reccommend creating a dial plan for each State/Territory your users are located in, this will allow for localised dialling for their location.
Australia
- Click Add to create a new normalisation rule
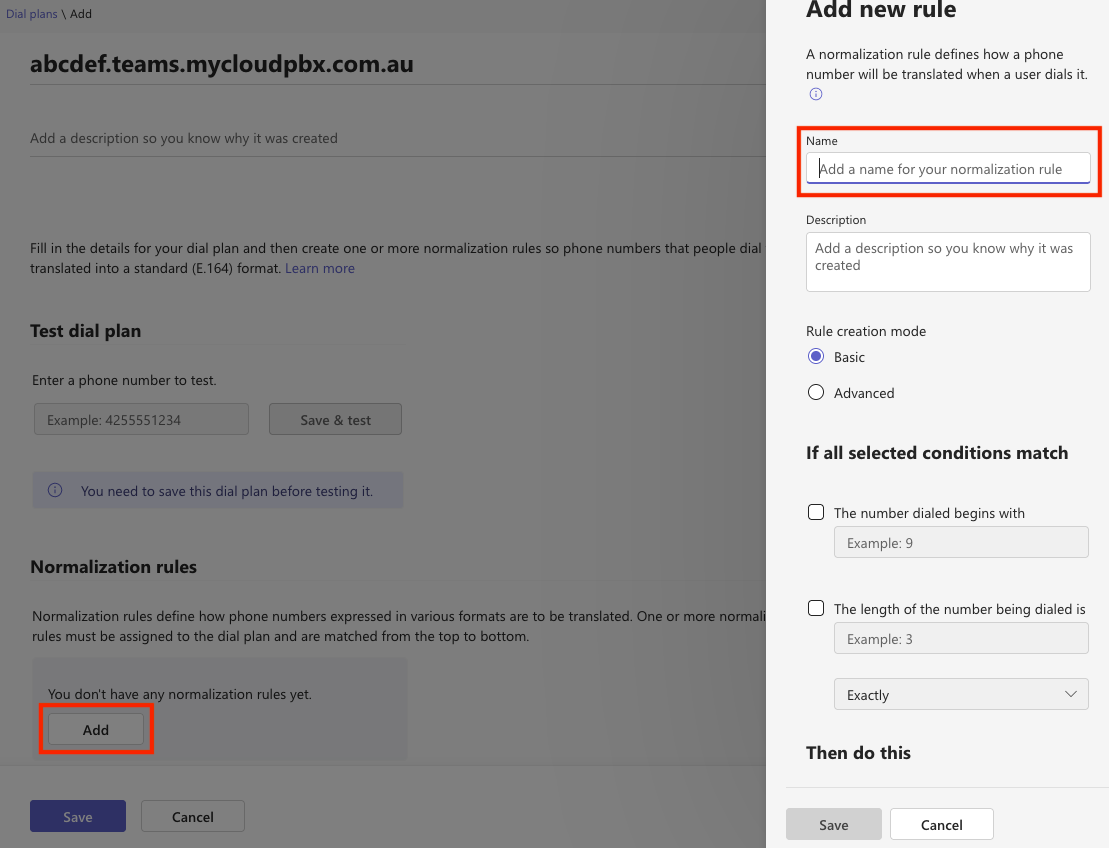
- Enter a Name and click Advanced, follow this process to create a new rule for each of the following
| Name | Rule Creation Mode | If Condition | Then Do This |
|---|---|---|---|
AU-National | Advanced | ^0([2\|3\|7\|8]{1}[0-9]{8})$ | +61$1 |
AU-Mobile | Advanced | ^0([4\|5]{1}[0-9]{8})$ | +61$1 |
AU-13-1300 | Advanced | ^(13(\d{4}\|00\d{6}))$ | +61$1 |
AU-1800 | Advanced | ^(1800\d{6})$ | +61$1 |
AU-0011 | Advanced | ^0011(\d+)$ | +61$1 |
AU-000 | Advanced | ^(000)$ | $1 |
Create local dial plans for users in a specific state/territory and allocate as required
| Name | Rule Creation Mode | If condition | Then do this |
|---|---|---|---|
AU-Local-02 | Advanced | ^([2-9]\d{7})$ | +612$1 |
AU-Local-03 | Advanced | ^([2-9]\d{7})$ | +613$1 |
AU-Local-07 | Advanced | ^([2-9]\d{7})$ | +617$1 |
AU-Local-08 | Advanced | ^([2-9]\d{7})$ | +618$1 |
- Click Save
- Assign the Policy to users by selecting Users > Manage Users and Select the User, click Policies
- Select Voice Routing Policy > Edit
- Choose example.teams.mycloudpbx.com.au from the Drop Down List
New Zealand
- Click Add to create a new normalisation rule
- Create a new rule for each of the following
| Name | Rule Creation Mode | If condition | Then do this |
|---|---|---|---|
NZ-National | Advanced | ^0([2\|3\|4\|6\|7\|9]{1}[0-9]{7})$ | +64$1 |
NZ-0800 | Advanced | ^(0800\d{6,7})$ | +64$1 |
NZ-0508 | Advanced | ^(0508\d{6,7})$ | +64$1 |
NZ-0900 | Advanced | ^(0900\d{6,7})$ | +64$1 |
NZ-Mobile | Advanced | ^0(2\d{7,9})$ | +64$1 |
- Create local dial plan for users in a specific state/territory
| Name | Rule Creation Mode | If condition | Then do this |
|---|---|---|---|
NZ-Local-02 | Advanced | ^([2-9]\d{6})$ | +64$1 |
NZ-Local-03 | Advanced | ^([2-9]\d{6})$ | +64$1 |
NZ-Local-04 | Advanced | ^([2-9]\d{6})$ | +64$1 |
NZ-Local-06 | Advanced | ^([2-9]\d{6})$ | +64$1 |
- Click Save
- Assign the Policy to users by selecting Users > Manage Users and Select the User, click Policies
- Select Voice Routing Policy > Edit
- Choose example.teams.mycloudpbx.com.au from the Drop Down List
Misc Dialplan rules
These dialplan rules allow for additional features within myCloudPBX such as Star Codes.
| Name | Rule Creation Mode | If condition | Then do this |
|---|---|---|---|
Star Codes | Advanced | ^(\*\d*)$ | +61$1 |
Private Caller ID | Advanced | ^(1831\d*)$ | +61$1 |
Emergency Call Routing
Create an Emergency Call Routing Policy
- Go to Voice > Emergency policies in the left navigation menu.
- Select the 'Call routing policies' tab.
- Click Add to create a new policy.
Tip
You can create a Policy per country, or bundle them all into one.
Warning
If you use a single policy per country, or bundle them all into one policy, make sure that you have covered the emergency phone numbers for any Country that you are using on the PBX.
Proceed to add an Emergency Routing Policy for each Country you plan to support on the PBX.
Australia
- Enter
AU 000 myCloudPBXfor the name of the Call routing policy - Enter
000for the dial string - Select example.teams.mycloudpbx.com.au from the drop down PSTN usage record
- Click Save
Apply Emergency Call Routing Policy to Users
- Select Users > Manage Users and Select the User, click Policies
- Select Emergency Call Routing > Edit
- Choose example.teams.mycloudpbx.com.au from the Drop Down List
Sample Emergency Number List
Note
This list is not exhaustive of all Countries, please ensure you check which Emergency numbers are relevant to you.
| Country | Emergency Phone Numbers |
|---|---|
| Australia | 000 |
| New Zealand | 111 |
| USA | 911 |
| United Kingdon | 999 |
Example PowerShell Snippet
Set-CsPhoneNumberAssignment -Identity "ben@example.com" `
  -PhoneNumber +61370006700 `
  -PhoneNumberType DirectRouting
Understanding Caller ID Issues
When no Caller ID is sent, myCloudPBX cannot validate the true Caller ID for logging and Call Detail Records (CDRs).
We'll still route the calls out for you, however we won't be able to pin the call down to a specific user and you'll need to review the logs from Microsoft Teams (in the event you need CDRs) instead of within the myCloudPBX Dashboard Reporting.
Whenever we do not receive a valid Caller ID, we will use the Default Caller ID configured on the Connector to ensure success of the call.
To address this, we've introduced a new feature in the myCloudPBX user interface. You can now choose to either send the Caller ID or hide it on a per-user basis.
When hidden, the Caller ID is concealed from the recipient, but it remains visible in the CDRs, enabling accurate tracking and analytics.
Related Articles
How to Record a Microsoft Teams Meeting Using Xbox Game Bar on Windows
The Xbox Game Bar is a pre-installed feature on Windows PCs designed to enhance the gaming experience, offering screen recording capabilities. While primarily intended for gaming, it can also be used to record any on-screen activity, including ...Set Up a Shared Calendar in Microsoft 365
A shared calendar in Microsoft 365 makes it easier for teams to coordinate schedules, manage appointments, and keep everyone informed about upcoming events. Whether you're supporting a department, reception desk, or project team, a shared calendar ...Set Up Your Microsoft 365 Email
Get Your Microsoft 365 Mailbox Ready Accessing your Microsoft 365 email on your computer, phone, or tablet allows you to stay connected wherever you work. Once configured, your mailbox will sync across supported devices, giving you access to email, ...Microsoft Dynamics
The myCloudPBX Dynamics CRM Integration enhances customer relationship management by integrating your call activities directly with your existing Dynamics CRM. It features call journaling (with optional automatic contact creation) and automated CRM ...Migrate Email Accounts to Microsoft 365
Moving your email accounts to Microsoft 365 provides access to modern collaboration tools, improved reliability, and centralized management. With the right preparation, you can migrate mailbox data with minimal disruption while maintaining access to ...